The title being a given, the question that quickly arises is; “What makes a trunk great?” and only marginally second comes the question: “How do we create a great trunk?”.
In order to grow great trunks and have some control over the shape, taper and thickness one should have some basic understanding of how plants grow, and in particularly, the function of the trunk. Note that this article is an in-depth extension to the introductory Bonsai trunk article.
What makes a Bonsai trunk great?
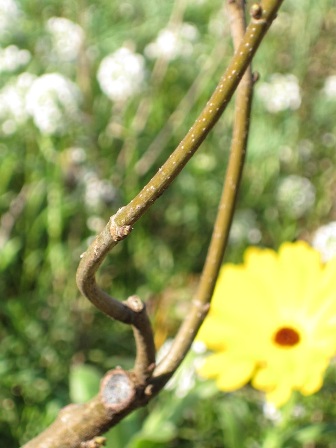
A great trunk in Bonsai is a trunk that has a weathered look (in other words: That looks old), is firmly settled in the soil with a nice Nebari [root flare] and has nice taper [thinning of the trunk towards the highest point]. Good Bonsai will not have inverse taper (the trunk getting thicker when moving up in the tree). Most often Bonsai are grown in a style in which a solid old tree as seen from the ground is simulated. This position normally causes a distorted view of the trunk, where the tapering is extreme. In Bonsai. a rule of thumb is: The diameter of the trunk at the lowest point determines the maximum height of the tree. If the diameter is for instance 2" (5cm) the tree can be 6-12 times the diameter, in other words 1-2' (30-60cm), high. The canopy of the tree typically starts at about 1/3 of the height of the tree. In this example that would be at roughly 4" (10cm) above the soil. Side-branches should not be thicker than 1/3 of the thickness of the trunk at the attachment location.
In summary, a great trunk consists of:
- Strong Nebari [root flare]
- Nice, regular taper [thinning of the trunk towards the highest point]
No inverse taper - 1:6 / 1:12 ratio in diameter at the thickest point to height of tree
- Dominance in thickness compared to branches
Why do trees have trunks?
The function of a trunk is twofold. First, the trunk supports the rest of the tree, and any forces upon it due to weather variables. It will therefor grow stronger with more external forces on the plant. As the roots develop with the same function (keep the tree up) the same goes here: To create a great Nebari, allowing external forces to affect the tree works wonders.
Second, the trunk is there to transport water and nutrients to the leaves, and move carbohydrates formed in the leaves to the roots. To do this, the bark has a layer of veins that carry the fluids up and down the trunk. In the resting period of the tree, the veins shrink, and partially close off. This forces the tree to create a new layer of veins when growth restarts. In temperate species this causes very clear annual growth rings. Each individual branch is connected to the veins below the branch. The growth of an individual branch therefore results in the thickening of the trunk below that branch. This can be used when creating taper. The more foliage the tree needs to support, the more veins are required to bring all the nutrients and carbohydrates up and down the trunk. Also, for more foliage, more roots are needed. Therefore, in mature healthy trees the roots and foliage are carefully balanced. More leaves means more roots.
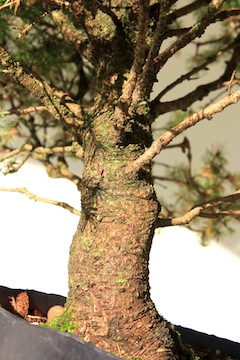
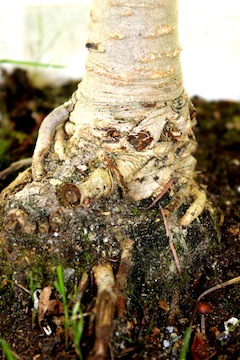
From left to right: Tapering of a Bonsai trunk, a Nebari [root flare] and pruning a side branch that was left in place previously to enlarge the trunk.
How to make great trunks?
The first thing to remember is: Trunks will only fatten up when the plant gets a lot of growth. Bonsai trees in small pots where we effectively limit the growth will not show a lot of growth in trunk thickness. Growing trunks mean growing your tree. This is one of the main reasons why –as a rule of thumb- serious Bonsai growers will start off by worrying about the Nebari and trunk, before growing a canopy. Effectively, you start building a tree by creating a good root structure, then a good trunk and then the branch structure.
Cut-and-grow
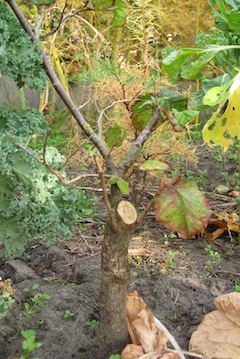
This brings us to the fastest method to grow a thick trunk: The tree is planted (e.g. on top of a buried tile to create a nice flat root-ball) in full ground or a large container, and left to grow for a few years. When the trunk has 2/3rds of the desired thickness, the tree is cut off, at 1/3 of the height of the desired final tree height (see image 1 below, left). The tree may be as tall as 3 meters (10 feet) tall before cutting it for the first time! The cut leaves a stump of only 10 centimeters tall for a tree with max height of 30 centimeters (4 inches stump for a 1 foot tall tree). This is once again left to grow out.
Because of an imbalance between roots and canopy, one can expect explosive growth in the first year after cutting it down. Soon after the tree starts to grow branches from the stump select the one you would like to create the next section of trunk from. This branch is tied as vertical as possible. The rest of the branches are kept smaller, and any branches that show a clear trend to grow up are clipped. Branches growing lower on the trunk are left to grow, as they add to the thickness of the trunk below the point of attachment, and therefor to the taper of the tree. Once the new leader has reached 2/3 of the thickness of the trunk just below the cut, a new cut is made, at 1/3 of the remaining height above the first cut, and the procedure is repeated. Repeat the cut-and-grow procedure as often as you want. A minimum however Is 3 cuts, to create a realistic effect.
Advantage: A thick trunk with strong taper is created in the shortest amount of time
Disadvantage: The cuts leave big scars which take years to heal over, and will never completely disappear. Also, the newly formed main trunk is not in line with the old trunk, creating slight bends in the trunk, undesirable for formal upright or broom-style trees.
Species: This works on trees that easily create new buds on branches without leaves. Typically these are deciduous trees. Pines will not easily re-sprout and you may kill pines with this method.
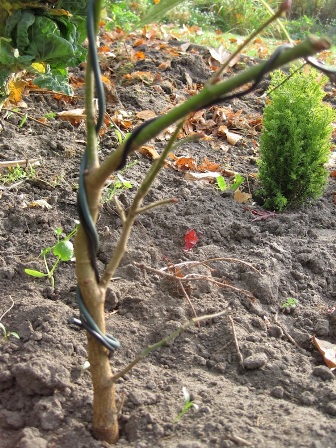
A trunk cut aggressively (cut-and-grow technique)
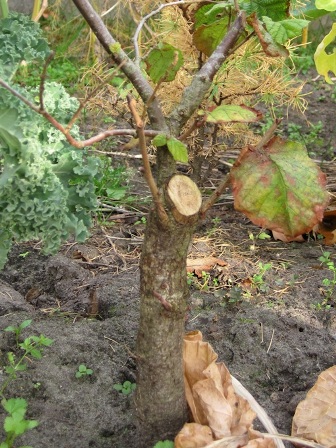
A trunk created by yearly pruning (annual-trim technique)
Annual trim
With this method you let the plant grow out as much as it wants for the year. In winter the plant is trimmed, removing most branches, and cutting the main stem back to just a 1/2" (1cm) above the point where it started in spring (see image 2 above, right). This is repeated until the trunk has the desired height. Side-branches are removed as desired, but are not allowed to grow for more than 2-3 years. Although they add to the taper of the tree, older branches will increase in thickness very quickly, and may dominate the whole plant. The scars after removing these branches will be very big and require a long time to heal.
Advantage: The scares on the trunk are smaller, and will heal in just 2 or 3 years. If treated properly with a branch cutter, the scar may be virtually invisible after healing.
Disadvantage: The trunk grows a lot slower than by the cut and grow method. Taper is not as extreme. Also, the newly formed main trunk is not in line with the old trunk, creating slight bends in the trunk, undesirable for formal upright or broom-style trees.
Species: This works best on species that easily create new buds on branches without leaves.
Side-branch extension (sacrifice branch)
This method is similar to the cut-and-grow method. However, instead of growing out the leader of the tree, here we keep removing the growing point from the leader, and stimulate side-branch development. By allowing 2 branches to grow out and keep the rest of the trunk thin, tremendous taper may be achieved. After 4-5 years the individual side-branches are removed, and may be used to create Uro [Trunk-hollows] for deciduous, and yin for narrow-leaved evergreens, as the resulting scars often don’t heal over properly.
Advantage: This method results in very strong taper, and scars are on natural-looking locations. Particularly for some evergreens, this is the only way to get trunk thickening without spending decades waiting.
Disadvantage: Large scars on the trunk will not heal properly. Creating a realistic-looking Uro is a challenge for beginners.
Species: Particularly suitable for trees that do not back-bud well.
Growing a thick Bonsai trunk
Bend-and-grow
Here, young plants are allowed to grow a strong leader during the growing season. Towards the end of the growing season, the leader is bent down. This is done in a way that the attachment of the first side-branch of the year is in the middle above the trunk. The major part of the old leader is trimmed off (all except for the part required to keep the leader bent is removed). The side branch is wired straight up, as to form a continuation of the trunk (see image 1 below, left). Next growing season, this will become the new leader. This process is repeated for several years. Side-branches are allowed to develop and grow for 2-3 years each, to assist in adding taper and thickness to the trunk.
Advantage: Small scars on the trunk. It is possible to develop a near-perfect straight trunk.
Disadvantage: The trunk grows a lot slower than by the cut and grow method. Taper is not as extreme.
Species: This method works for all species
A trunk grown thick by using the bend-and-grow technique
A trunk created by the Bonsai trunk merging technique
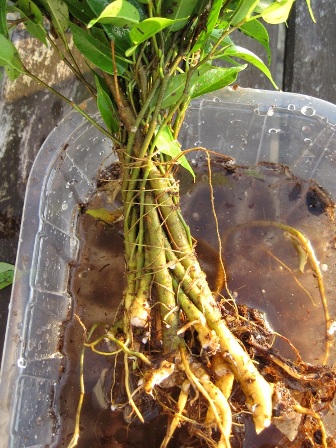
Trunk merging
Although not formally a way to get a trunk to become thick, it is a way to create a tree with a thick trunk in the shortest time possible. Here we start with a series of young saplings, which are tied around a supporting cone-shaped object. The saplings are placed as tight against each other as possible. With tape, or thin rope, the saplings are fixed in place (see image 2 above, right). The whole set is then brought to a vigorous growth. With growth come an increase is thickness of the saplings. With no place to go, the trunks will merge, and become visually one plant. Merging may take place within months after tying them together. In order to avoid die-back of a complete section of the new tree, the saplings are ideally interwoven a little. That way veins will grow across multiple saplings and can help support a sapling when individual root-systems fail. Read more on Bonsai trunk fusion.
Advantage: The fastest way to get a thick trunk from a batch of your cuttings, with very limited scarring.
Disadvantage: This is not straightforward and the resulting trunk is hollow, leading to potential trouble as the tree gets older (Insect infestations).
Species: This works well with fast-growing species, particularly ficus. But most trees are capable of merging cambium with other individuals of the same species.
Written by: Jelle Ferwerda (check his website bio-vision.nl for more)