Contrary to the belief that yamadori or wild trees are the only source of wonderfully old and gnarled bonsai, some of the best material can be found in our own back yards.
Private gardens can yield domesticated trees and shrubs whose size and form have been shaped for anything up to 50 to a 100 years. The repeated pruning or even the repeated damage from human activity over a long period of time can give rise to material that is relatively small in height but with a big fat and very interesting trunk, all features that are excellent as material for bonsai.
The cotoneaster: introduction

Cotoneaster microphyllus/Small-leaved Cotoneaster growing in a private back yard
The subject of this chapter is a Cotoneaster microphyllus or small-leaved Cotoneaster that had been discovered growing in a front garden by Faisal Waheedy.
Faisal often discovers raw material growing in the surrounding gardens of his neighbourhood and will often approach the owners asking if they would mind if he collects the tree or shrub for himself. More often than not the owners are more than happy to have what they see as an unsightly tree or shrub removed, free of charge!
Cotoneaster microphyllus is an excellent subject for bonsai, particularly shohin and mame-size bonsai, with its minute leaf-size, readiness to respond to hard pruning, prolific flowering and berrying.
Note: Cotoneaster is frequently mispronounced as 'cotton-easter'; the correct pronounciation is 'cot-own-e-aster'
As bonsai they have a reputation for being a little temperamental at times as some enthusiasts have had theirs die unexpectedly, however I find them to be a very tough species as long as a good quality, fast draining soil mix is used and the tree is fed the occasional dose of an ericaceous fertiliser, particularly in hard water/lime water areas.
Note that while Cotoneaster are not necessarily acid-loving, they do appear to deteriorate slowly in a pot when subjected to high pH conditions/hard water on a long-term basis. Bear in mind also that Cotoneaster as a genus are often found growing in very poor, thin and stony soils and therefore require well-drained soil when cultivated in a pot and do not respond well to heavy bonsai fertilizing for any length of time. Regular but light feeding regimes are preferred!
The cotoneaster: its styling

The Cotoneaster after Faisal had dug it up and potted it up into a shallow terracotta training pot.
In the Spring of 2010, Faisal collected his newly discovered Cotoneaster and planted it into a large terracotta training pot using 'kittydama'/high-fired clay as a fast-draining Bonsai soil medium.
As can be seen in the above image, given the tiny size of the tree's leaves, by comparison it had amazingly thick trunks (three in total), each with thick plated mature bark.
Having been pruned back to remove all the lower growth and suckers (unnecessary for a future bonsai design) the Cotoneaster was then left alone to recover from collection for the next 18 months.

18 months later and the Cotoneaster had not only recovered from collection but had thrived, growing several new branches of 20" (50cm) or more. At this point the owner of the tree asked me to style the Cotoneaster and so the process of finding the design within the tree began.
When I first viewed the now very wild-looking tree it was very difficult to see a bonsai design immediately; the three trunks were covered in potential branches but it was impossible to establish the best front and a design that would bring out the very best in the material.
So my first task was to remove all growth that I knew couldn't be part of a successful design. Shoots/potential branches growing from the base were removed, shoots of anything more than half the height of the trunk were shortened back. Where more than one shoot or potential branch emerged from exactly the same point on the trunk, all but one were removed.
The aim was to reduce the amount of growth to a minimum so I could find the design........without reducing my options in terms of which angle would be the front of the tree, which shoots would form the new trunk leader and which shoots could be developed into branches.

After slip-potting the Cotoneaster into a mica bonsai training pot.
August 2011: the biggest disappointment at this point was the discovery that the thickest trunk (on the right) was entirely dead and had in fact rotted badly down to its base. Previous hopes that I would be able to use this trunk as the main feature of the design were dashed! It was a disappointment to lose the thickest and heaviest trunk from the design but with the wood literally crumbling away, it was too rotted and unstable to save for any length of time, even with a wood hardening product. So the trunk was removed piece by piece until I had taken it back to the base where the heartwood was still strong.
However, its removal led to the discovery that the two remaining thick trunks could now be seen clearly, they had pleasing movement and flowed together well and would make an excellent triple-trunk design along with a much smaller shoot growing at the bottom right of the base. Now it was possible for me to visualise a final design!
My final task for August was to slip-pot the Cotoneaster into a rectangular bonsai pot. It must be understood by readers that repotting a bonsai out of season, that is, outside of Spring, is risky and can be very detrimental to the health and development of the tree. However, with experience it is possible to do with certain tree species at certain times of the year.
In the case of slip-potting, the tree is carefully lifted from its container, excess soil that does not have roots growing into it is carefully removed and the tree is then slipped into a different container without disturbing the roots.
In terms of the design of the Cotoneaster as a bonsai; it is now possible to see how I had pruned the growth leaving myself plenty of shoots that could be wired to form branches and how the new trunk-leader in the new main trunk had been pruned to provide natural taper and movement. However, to solidify the design, I still needed to carve the trunks to add interest and taper as well as to remove more rotted heartwood.

Carving the deadwood
September 2011: A couple of weeks later in mid-September, I began carving the deadwood of the Cotoneaster bonsai. Carving live wood (on trunks or branches) can be stressful to a tree particularly when done in conjunction with any other kind of trauma such as repotting or heavy pruning and wiring. However, the vast majority of the carving carried out on the Cotoneaster was on already-dead areas where the cambium had previously died back and so caused little, if any stress.
My main priority was to introduce taper to the dead areas of the trunks, in particular to the obliquely chopped top of the main trunk on the left. Using a Dremel and a mixture of small carving bits to remove the wood, I created a pleasing outline or silhouette to the trunks and the design overall, and then began to add shari and uro on the trunks themselves to create interest and drama on the otherwise quite bland surface.
Note in the image above that I have temporarily covered the soil surface with old newspaper to prevent the open and fast draining soil from becoming clogged as I carve with wood dust.

September 2011: With the carving finished it was time to complete the styling process by fully wiring the branches so that each and every one could be placed exactly as I intended.
At this stage in the development, the trunks, the main front view and the 'feel' and 'emotion' of the composition has now been established. The coming years will see the refinement of the design as the taper of the branches and the ramification of the foliage increases. Specific development will now be needed on the smallest of the three trunks (right of the base) which while now established, looks insignificant in comparison to the two bigger trunks.
Detail shots: the Cotoneaster's deadwood and trunk work

The base of the Cotoneaster; the carved area in the foreground is all that remains of what was once the thickest trunk.

The remaining area of the largest trunk again, this time from a different angle.
Carved area seen from the left. At present the deadwood has been left untreated. Both myself and the owner Faisal Waheedy prefer the natural appearance of the wood in preference to it being whitened using Lime Sulphur. Once the wood has begun to weather I will apply several coats of wood hardener to protect the wood from rotting in the future.
Right: Detail image of the upper part of the main trunk.
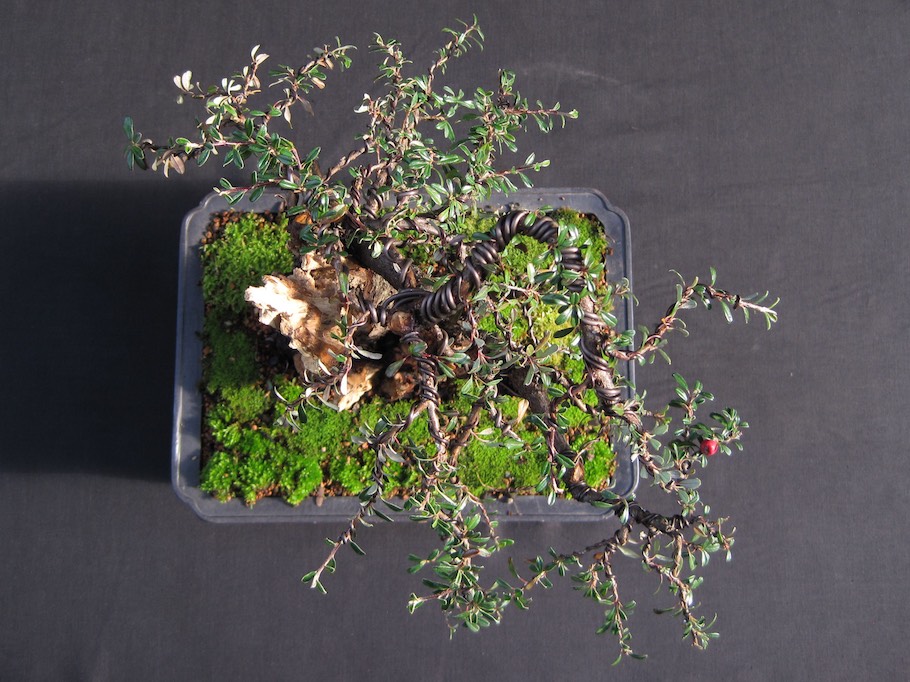
September 2011: From above it is possible to see that not only does the foliage mass as a whole lean forward, but each branch grows outwards into its own area of the canopy and therefore its own light.
Written by: Harry Harrington, Bonsai4me.com - "Harry shares a great number of wonderfully detailed Bonsai progressions on his website, mostly featuring indigenous tree species (he lives in the UK). He also writes and publishes Bonsai books, which are highly recommended, also see his Bonsai artist profile; Harry Harrington.