For Bonsai, grafting is used for a variety of purposes: to add a branch on a specific place to a Bonsai, to replace foliage with a more delicate plant-variety, to add roots to enhance the Nebari (root flare or surface roots) or to cultivate a new tree combining desired characteristics of both plants. Grafting can be tricky, so start experimenting on inexpensive material to gain experience first.
When?
Most tree species should be grafted late winter, just before the buds start to swell - this applies to both thread- and scion grafting. Approach grafting should be performed in summer however.
How to graft a Bonsai tree
Grafting will only work when the graft and tree belong to the same species. Pines and Junipers are the exceptions, one often finds Rocky mountain junipers grafted with itoigawa juniper foliage for example.
Three techniques are commonly used for Bonsai purposes; scion grafting (inserting a separated graft into a trunk or branch), approach grafting (fusing a branch (that is still attached to the donor plant) to a tree, and thread grafting (drilling a hole in a trunk or branch, and threading a branch of the tree through it).
Scion grafting
Scion grafting involves removing a small shoot or branch from a donor plant and inserting it into the receiving plant. This technique can be applied to Junipers, Pines and both deciduous and broadleaf evergreen trees - often to add branches or to replace foliage. When done correctly, the grafts scars will be completely invisible over time.
When scion grafting, make sure that both the donor plant and the receiving plant are in good health, or as good as possible. Fertilize both plants well during the growing season prior to grafting, which will take place in late February or early March (i.e. late winter or early spring) in the northern hemisphere. Also, keep both the donor and receiving plant under slight cover during the winter months before grafting. The trees should be allowed to go dormant, but avoid harsh frosts during that period.
- In late winter or early spring, begin the scion grafting process by identifying terminal shoot growth on the donor plant. Ideally, shoots should be woody at the base and about 2.5-4" (6-10cm) long. Cut off the shoot flat and remove any foliage near its base.
- Immediately after removing the scion from the donor plant, use a sharp, sterile grafting knife to make two cuts at its base. The knife can be sterilized with alcohol. The first cut will be a long, gradually sloping one, made by holding the scion in one hand, placing the knife against the scion and gently pulling the scion towards oneself, while gently pushing the knife away. Flip the scion over and make a slightly shorter, sharper angled cut on the opposite side. The length of this second cut will be about 1/2 to 2/3 the length of the first cut. Try to avoid touching the freshly cut areas of the scion, as this can cause damage or infection. See first photo.
- Then, take the stretched grafting tape and begin wrapping the scion from the base of the foliage, overlapping the tape by about 1/2 on each turn. Do not pull the tape too tightly, because this will crush the foliage, but be sure it is tight enough to keep water from seeping in or out. At the end of the scion, twist the tape completely closed.
- Next, identify where the scion will be grafted onto the receiving plant, either on a live portion of the trunk or branch, and use a grafting knife to slowly make a cut in the precise position. The cut should be long enough to fit the entire end of the scion that was previous cut, and it should be deep enough to cut through the cambium layer, down to the hardwood beneath. Try not to wiggle, damage or lift the cut flap during the cutting process. See second photo.
- Next, slowly insert the cut end of the scion into the flap on the receiving tree. Support the scion at the base with your fingers, so as to avoid damaging it during insertion. Make sure, too, that the longer cut surface is against the trunk or branch and that the shorter cut surface is facing outward (i.e. touching the previously cut flap). Insert the scion and try to align the cambium layer on the donor scion to the cambium layer on the receiving plant. See third photo.
- Lastly, pre-stretch another length of grafting tape and begin wrapping it around the insertion point of the graft. Be sure not to wiggle, bump, or damage the scion as the tape is applied. Wrap several times, again overlapping by about 1/2 on each turn. Wrap the tape on both sides of the graft point as well, just like this. No water should be allowed to penetrate beneath the tape, as this can cause rot and the scion graft will likely fail. See fourth photo.
- Following the grafting process, protect the tree from frosts for the remainder of the cold season. Also, place the tree in partial shade, or at the very least cover the grafts with tin foil or other light-cutting material for the entire growing season. During the course of the first growing season, if the grafts are taking successfully, the shoots will begin pushing at the wrapped end of the grafting tape. As this occurs, slowly begin to unwrap the tape, typically starting in late May or early June.


Approach grafting
Approach grafting involves attaching a donor plant with the roots still intact to the receiving plant with the goal of changing the foliage type of the tree or adding branches in desired positions. Rather than cutting a shoot from the donor plant and inserting into the receiving plant, approach grafting requires the use of a fully intact donor plant (also called a ‘whip’) and attaching it (roots still attached) to the receiving plant.
If done properly, this technique provides both a higher success rate and faster development time than the previously discussed scion grafting technique. Approach grafting Junipers should be done during the growing season when the growth of both the donor and receiving plants is most vigorous. In this example we will graft new foliage closer to the trunk, to eliminate the tree’s leggy appearance.
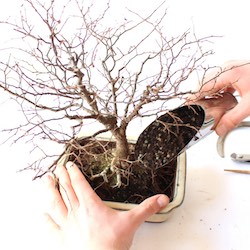
- In order to properly perform approach grafting the donor plant whip must be properly prepared in the years leading up to the grafting process. Start by taking cuttings from a donor plant with ideal foliage in this case we are utilizing cultivated Itoigawa Shimpaku of medium coarseness to match the size of the tree. After the cuttings root in the first year allow one to two more growing seasons for the whip to elongate to at least 6-8” (15-20cm) with a diameter of 1/8-1/4” (or about the thickness of a pencil).
- Prepare the rooted cutting by removing foliage at the base of the woody trunk with sharp scissors making sure that about 2-3” (5-7cm) of the trunk is fully exposed and that there is a sufficient amount of foliage left at the end of the cutting. See photo one.
- Now we identify where the donor whip will be attached to the receiving plant. This could either be directly on the trunk, or on a branch such as this one here. Keep in mind that, depending on the species, approach grafts must be made either flowing directly with the directional flow of the receiving branch or trunk or directly against this flow. In the case of Junipers, approach grafts can be made in either direction; however, with Pines, for example approach grafts must be made with the directional flow of the branch or trunk.
- Next prepare a Dremel or Die Grinder with a machine head slightly smaller than the diameter of the donor whip, insert the machine head into the branch and be sure to press deeply enough so that the donor whip will fit flush inside the groove. See second photo.
- Next, take the grafting knife and cut the donor whip along the area of the woody trunk that will touch the sides of the groove exposing the cambium on both sides of the whip. See third photo.
- Slide the prepared whip into the groove, making sure that as much of the cambium of the whip aligns with the cambium of the receiving tree as possible.
- Next, take a piece of wire and lightly attach the whip to the receiving plant at two or more places along the union. The next step is to apply pre-stretched grafting tape along the entire length of the graft union. See fourth photo.
- Following approach grafting, be sure to keep the grafts protected from direct sun and make sure that they are watered frequently. Removal of the donor whip roots and original receiving plant foliage will occur in the following spring season.


Thread grafting
The best time to perform thread grafting on any deciduous or broadleaf evergreen species is when the tree is completely dormant, and the buds have not begun to swell.
- In the previous growing season, a lower branch was allowed to elongate for use as a thread graft. See first photo.
- Before making the hole in the trunk where the thread graft will be inserted it is first necessary to check the size of the bit relative to the size of the thread graft branch. The bit should be no bigger than the width of the largest buds to be inserted through the graft. Use a drill and insert the bit through the trunk from one side, and exiting out the other side at the point where the thread graft will be both inserted, and exiting, through the trunk. Make sure that the hole is straight and clean. See second photo.
- In order to bend the thread graft into position it is first necessary to wire using aluminum wire in the case of deciduous material. Very carefully bend the thread graft branch back around to the point at which it will be inserted into the trunk. Be sure to grip the thread graft branch at the base and carefully insert it into the trunk, and through the hole that you created earlier. See third photo.
- For the remainder of the subsequent growing season leave the tree untouched, allowing the thread graft to elongate as far possible. The following spring, the cut paste can be removed, and the graft can be checked. If the graft has taken, then the branch below the graft can be removed.