I am always exited when new material arrives at my shop. I study it, find their positive and negative aspects and think about new ways of improving them. I am most exited when confronting virgin material, eagerly anticipating the treasures entailed within.
This is such a case. I was anxious to reveal what was hidden within years of old bark, progressive accumulation of dirt and to see its various shapes. This excitement was quickly overshadowed by the challenge of how to find a solution of creating a tree with such a long branch. The first dilemma is evident, just by looking at the tree. Like the moon on a dark night: To cut or not to cut the branch…
Where to start the progression?
First of all, a few images of before the progression:
Front and back. Before shaping and after cleanup.
To cut, or not to cut
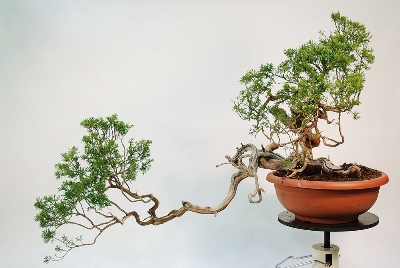
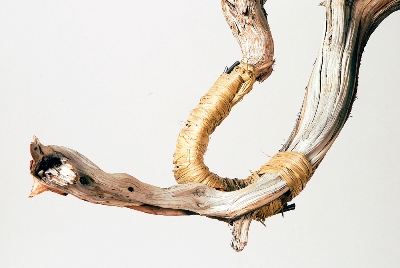
This is the first idea that comes to mind when looking at this juniper. The initial impulse is to eliminate that excessively long branch with growth only at the tips. This branch is like the black sheep of the family; with such divergent character from the rest of the tree and so distant from the main trunk that it seems that there is no option of integrating it into a design that begs for a reduction of 5' (160cm) in width.
After a few minutes of reflection, I finally found a solution that included keeping the branch. But why keep it if it's so out of place? Why not eliminate it once and for all? The newly found solution presents another question: How will the tree look without the branch? The fact is that we cannot always fix the problem by cutting branches. Sometimes the remedy is worse than the disease. Even an ugly branch full of defects may serve an important function, like the one in question.
If we closely examine the image in which the rear portion of the base of the tree is shown, in that part that will be the extension of the main trunk and the long branch emerging to the right, we note that the continuation of the main trunk is entirely too thin in comparison to the base of the tree. The taper is not gradual and the reduction in size is ridiculously drastic.
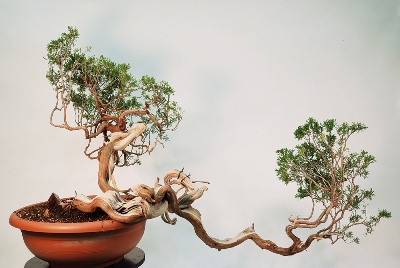
Now take a look at the image that displays the whole tree, at the chosen front. Imagine the tree without the long branch or picture an image that includes turning the base of the branch into a jin. Cover that portion of the picture with your hands to make it easier.
What we see is a thick/leaning trunk, that extends beyond the boundaries of the pot and that suddenly stops, thickening more at the tip than at the base. The continuation of the main truck begins at a low point and continues vertically, giving a sense that it sits on top of a fallen trunk. Without the long branch, that is what remains. It is true that we can reduce the top portion and bring it closer to the base of the tree, therefore bringing the green to proximity of the main trunk. I believe that solution will not have an elegant outcome. The end result will be one of those massive/green triangles sitting on top of a massive trunk, a style very much in fashion throughout Europe.
My idea is to bend that long branch in the middle potion and create the foliar structure in conjunction to the main trunk. Additionally, the main trunk will be bent towards the left, thus defining the movement of the whole composition towards that side. In place of creating a solid/compact green mass, I want to create spaces between the branches in order to better show the movement of the trunk and limbs. This way, the dead wood will be better displayed and a serene image of an adult tree that has surpassed all the forces of nature can be accomplished.
Good Ideas aren't always enough
The transformation process of a tree only begins with an idea; a proposed design and a mental picture of what the tree will look like in the end. This is the creative phase.
Notwithstanding, the creative process goes hand in hand with good technique, executed with such precision, that it enables us to accomplish our design goals. Correct execution of technique is something of critical importance and our willingness of perfecting our technique should never end. Perfecting our technique should serve as a motivational tool that will assist us to approach our trees with greater confidence and to better all aspects of Bonsai cultivation.
I employed several techniques, some simple and others complex, during the transformation process of this tree. While performing these, I took great care in executing them properly in order to achieve clean results that were as close as possible to my design plan.
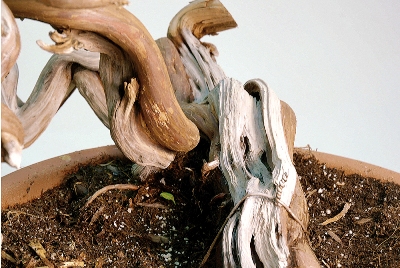
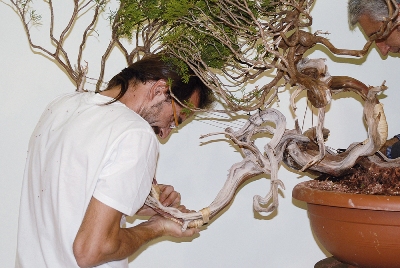
Rear view of the base, main trunk and point of origin of the long branch.
Right side, before work. The trunk leans forward excessively.
Cleaning up the bark
It arrived in my studio as raw, untouched material. It's amazing how Sabina junipers change with only minor cleaning. Its attractive features were hidden beneath layers of dirt.
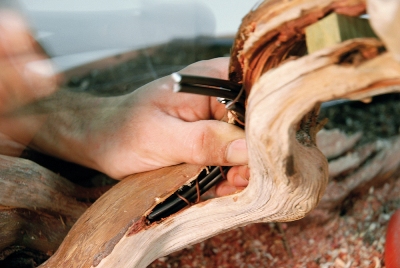
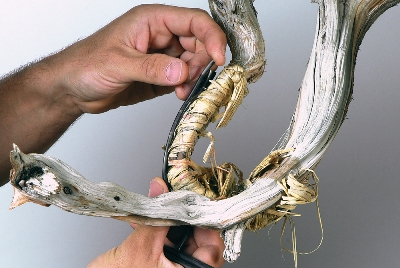
With a trunk splitter, I begin to tear the wood.
Note that a bit of wood was left between the separated live vein and the cut point which allows the creation of a jin that comes out of the interior portion of the trunk.
Bending the Main Trunk
The main trunk is that portion of the tree that will function as the continuation of the trunk line and ascends vertically. My proposed design requires the trunk to move towards the left, in harmony with its lower portion which trails along the ground. We also have to make an additional bend to minimize the excess in inclination the tree has towards the front, as pictured the right side image.
Bending this trunk is quite easy. We only have to separate the live portion from the dead parts. This will make the branch more flexible, but there is a problem. By separating the live vein from the dead wood, the part that remains visible from the front will look quite flat and unnatural. Because of this, I will first make a diagonal cut on the wood, enabling the creation of two Jin in that portion which will detract attention from the machined cut point.

With a power tool, we create some space in the remaining wood and a jin is created.
Almost done, only refinement remains.
On the other hand, because we still have to twist the trunk in order to be able to position it towards the left and back. We eliminate the remaining dead wood from the vein. Make sure not to damage the cambium! The two jin will cover the bending point.
We reinforce the live vein with two (2) 5mm tutors.
We cover the branch with raffia for better protection while bending. We make sure is placed as tight as possible.
Lateral view. Logically, we don't cover the jin.
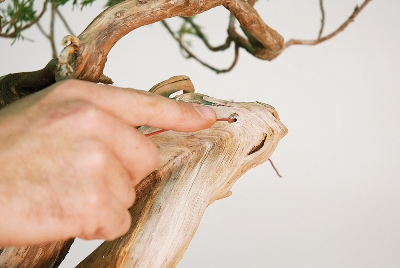
We advantage of a hole created by a boring insect, increasing it a bit in size, and use it to place our guy wire.
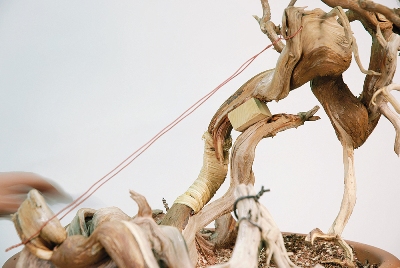
With the aid of only one guy wire, the trunk should bend with ease, permitting us not to use excessive amount of wire. At the same time and with one hand, we bend the trunk. With the other, we feel the pressure and tension applied to the bending point to avoid breakage.
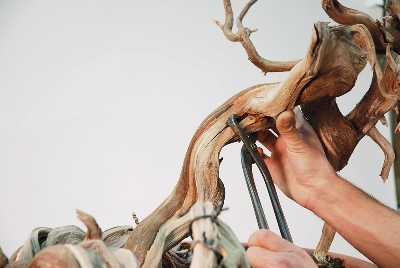
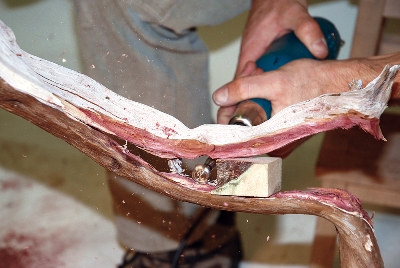
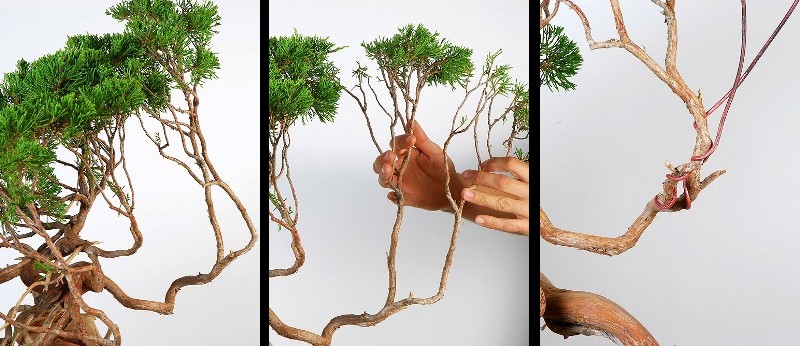
Bending the long branch on the Bonsai
Following the same procedure mentioned above, we bend the long branch. For both aesthetic and technical reasons, not only do we have to be careful when applying pressure, we have to be able to determine the exact bending point. The amount of tension will be of such force and will be employed in an area that is so visible that any mistake will remain in sight. Careful planning is of pivotal importance. We have to take into account the direction where we want to bend, how to do it, as well as placement of the foliar masses in order for the bend point to be as aesthetically pleasing as possible.
We choose the central portion of the branch as the bending point; where the wood bulges up and we have a small short jin. After the operation, the jin will be a bit longer, and the rest of the branch will be bent towards its point of origin.

We need a little assistance during this operation. Although high amount of tension was placed on the tree, it seems free of wires that will ruin the aesthetics of the results. I again insist on the cleanliness of all procedures and technique.
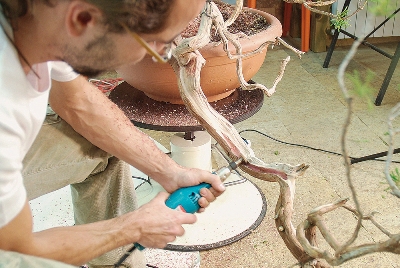
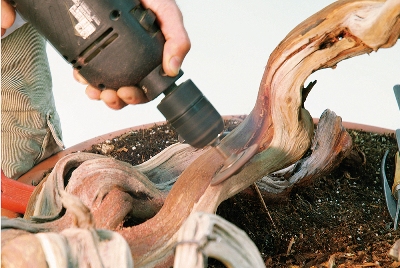
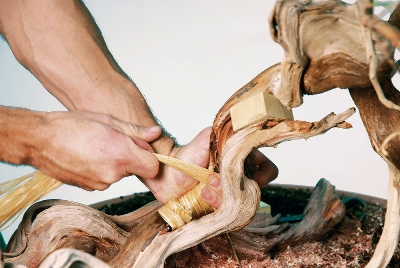
With a carving bit, we remove the gross amount of wood creating a channel, separating the jin from the live portion.
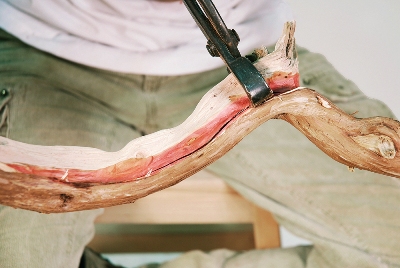
We will do it from the front and back, as much as the carving bit allows us. With a trunk splitter, we finish the separation.
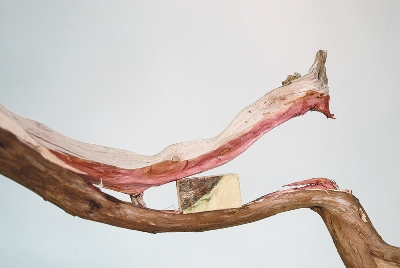
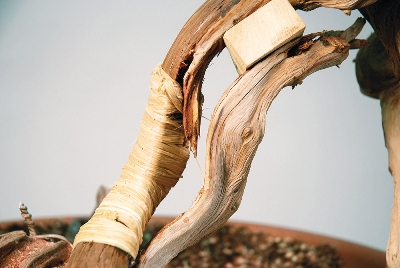
The wood block permits us to maintain the channel open while we eliminate the heart wood.
We eliminate the gross amount of the wood from the live vein to make it more flexible.
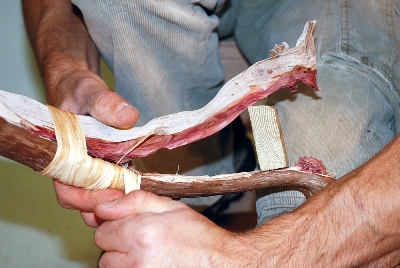
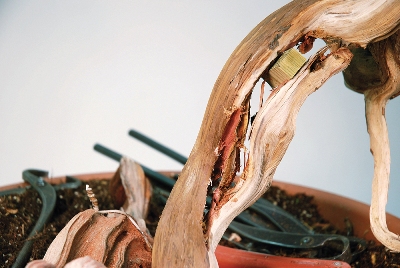
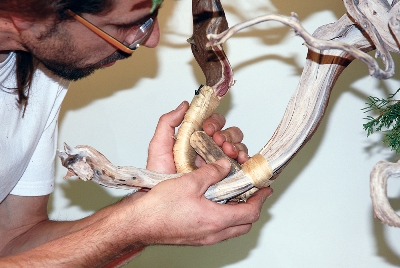
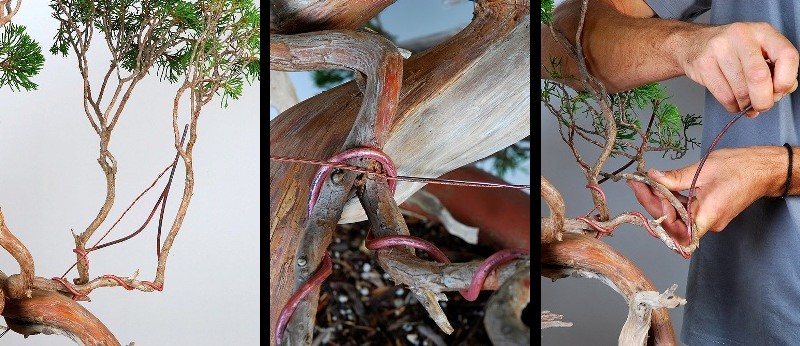
By feeling the length of the branch we determine that the girth of the live vein is equal in all its parts. Very Important! This time won't use tutor wires in the interior portion. We apply a first layer of raffia.
Now, two 5 mm tutor wires, but on the exterior portion of the live vein. They should be as close to the branch as possible in order for them not two move while applying the second layer of raffia.
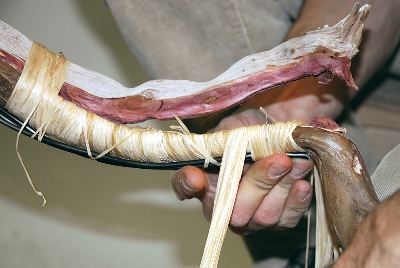
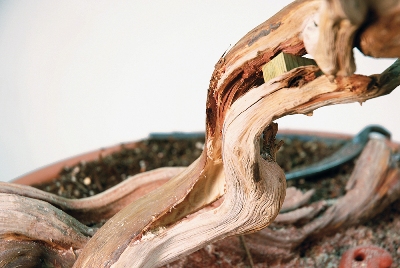
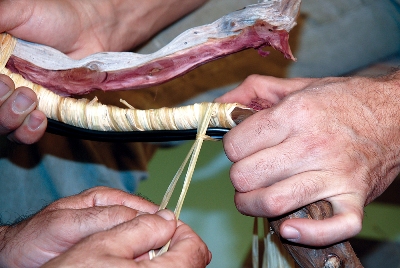
The second layer should be as tight as possible. Make sure not to tear off the live vein! We affix the tutors with strands of raffia, longitudinally. We fix a guy wire from one jin to the other and everything is in order for the bending process.
We not only have to bend the branch up, we have to bend it backwards, making sure to go over the jin.
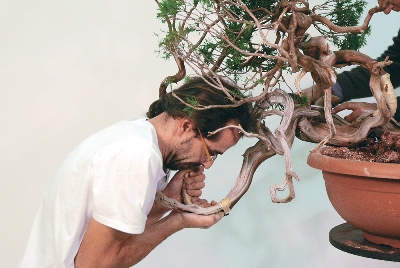
It's quite impressive that we are able to bend it. In the meantime, an assistant fixes the guy wire. Its important to feel the amount of applied tension by doing so, we limit the amount of pressure we are able to exercise. We still have a bit more to go.
If large amounts of tension are concentrated in one point, we risk breakage of strangulation of the live vein with the wood block, we are able to keep the gap open and avoid fraction.

After work. Almost the entire green portion remains hidden behind the container.
Knowing how to wait
The ability Sabina Juniper Bonsai trees have to withstand heavy bending procedures is quite astonishing. After all, it's part of their nature. If they weren't flexible enough and capable of withstanding heavy snow winds, they would succumb to their surroundings. The fact that they have the ability to tolerate such procedures does not mean that we should always test their limits. Because of this and after establishing the main trunk structure, the tree was left untouched to recuperate for one growing season. Once the tree was allowed to recover, we performed the first styling of branches and foliar masses.
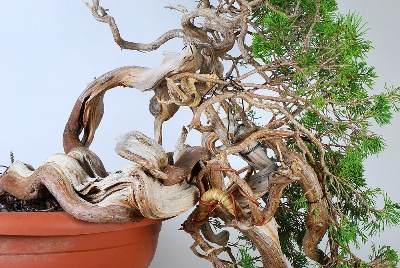
Left and middle: Front, before work. The evolution of this tree has been favorable and it is now quite strong. The green portion of the former long branch was raised over the trunk to allow it to receive sunshine.
Right: Back, before work. The foliage of the former long branch should be distributed in all directions, particularly to construct the cascading branch.
Detail shots; Raffia on the branch
We are now able to remove the raffia and evaluate the results of the operation. This is a good time to make conclusions and take notes for future work. A time to perfect our technical ability.
Detail shots; the branches and their position
Some branches were opened longitudinally to facilitate bending.
Rear view. In order to work with the right side of the tree and have a clear idea of how to properly distribute the foliar masses, we move the branches towards the left (right side, per image) We tie them together with a wire.
Wiring the branches on this Bonsai
A difficulty I encountered with this tree was the fact that the green portion was far away from the trunk, only at the tips of the branches. Some limbs, like the one in this example, seem impossible to use. Taking ample advantage of the flexibility of this species and with a little technique, we’ll be able to make use of them.
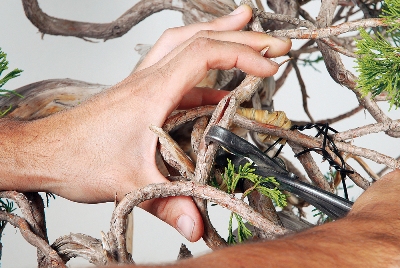
Wires in a Bonsai are quite ugly. As such, the least amount of visible wire and the cleaner your bonsai wiring technique is the better. To bend large branches it is not necessary to load them with large amounts of wire and raffia. In many cases, it's just a matter of ingenuity and proper technique.
Left: In spite of its shape and position, this will be the first right branch.
Middle: The main branch bifurcates in two secondary branches. We won't wire the main branch.
Right: The first wire is used for the secondary branches, in the bifurcation point but only at the base.
Left: We place a guy wire from a jin to the wire placed at the bifurcation point and we lower the branch.
Middle: Detail. We don't protect the branch because the guy wire in fixed to the wire, not the branch.
Right: We finish wiring, shaping branches as we go.
Left: We follow the same procedure, placing branches while we wire.
Middle: Until we finish.
Right: We then wire the rest of the tree, fanning growth outwards for it to receive sufficient light. After work. We now have to do the same with the remaining portion of the branch.
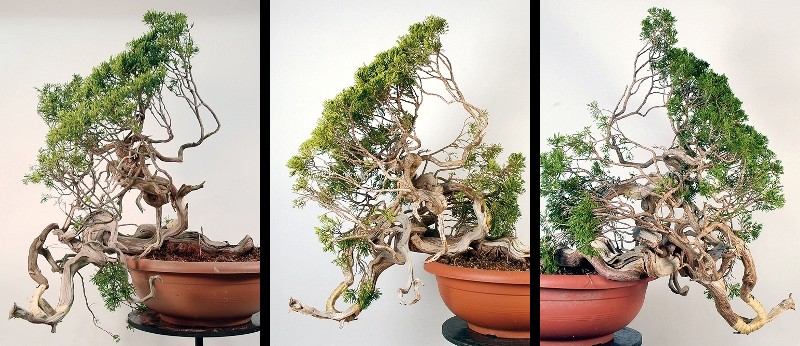
Evolution of the styling work, in images
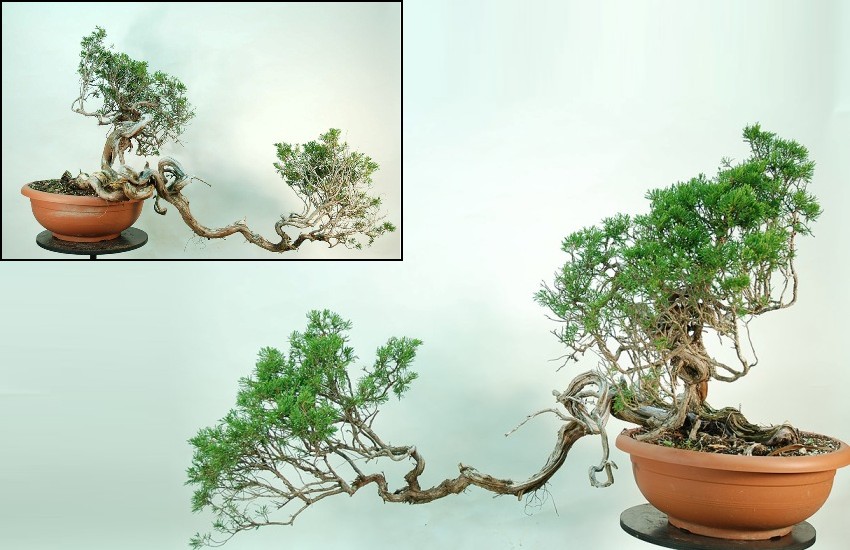
Image: Before work; width 5' (150cm).
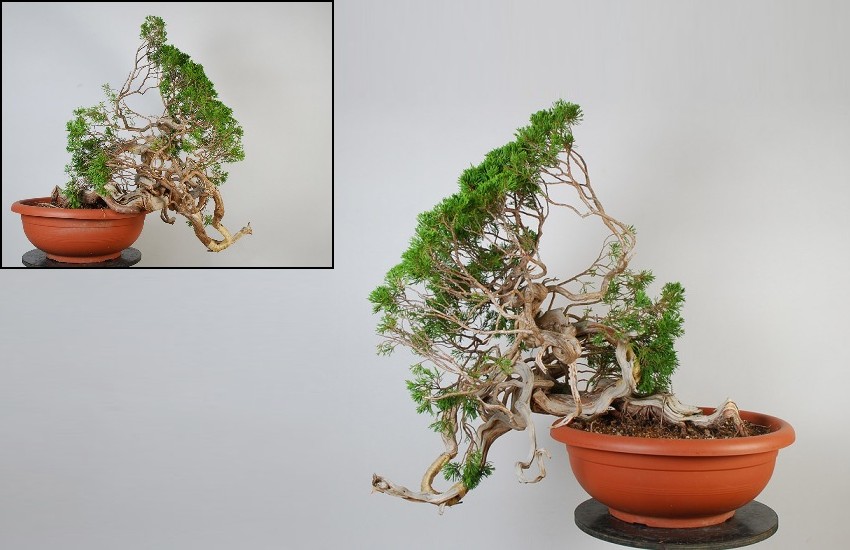
Image: After bending the long branch
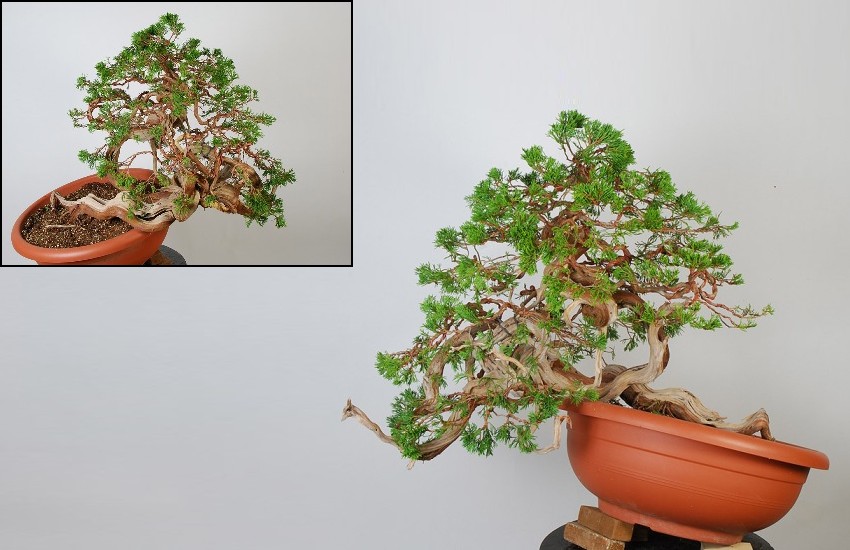
Image: After bending the main trunk
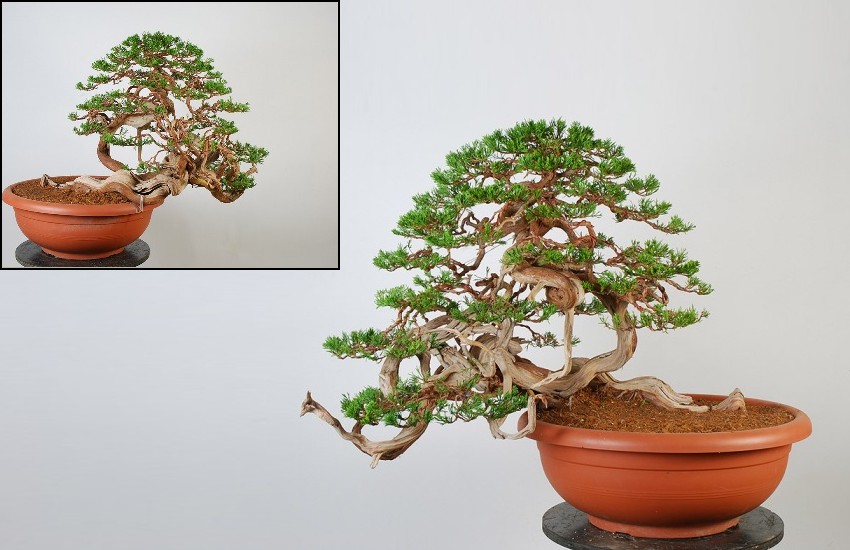
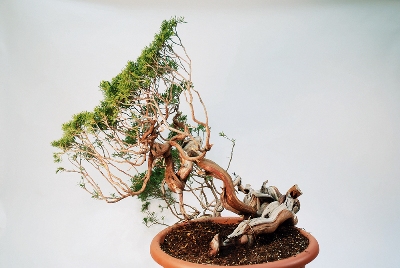
Image: A year after bending the main trunk and long branch and after styling the canopy
Image: how I got the tree
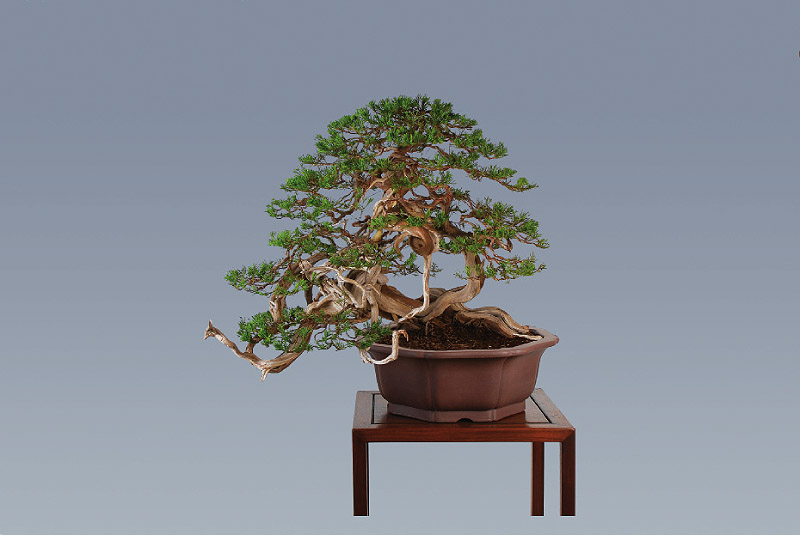
Image: The final result! Width 3' (80cm).
Written by: David Benavente, translation by Jose Luis Rodriguez Macias. Navamora, 5. 28260 Galapagar, Madrid – Spain - visit their website at davidbenavente.com.